If you’ve been putting off replacing your cabin air filter because it sounds like one of those annoying, mysterious car chores, good news — it’s actually ridiculously easy. Like, easier-than-assembling-IKEA-furniture easy.
You don’t need to be a mechanic, you don’t need fancy tools, and if you’ve got 10 minutes and a little bit of patience, you can have cleaner, fresher air swirling through your ride in no time. Let’s break it down.
Key Highlights
- Replacing a cabin air filter costs around $15–25 if you DIY.
- It usually takes under 10 minutes.
- No special skills required — just a new filter, a little patience, and a cloth for the floor.
- Check airflow arrows, don’t force anything, and clean up as you go.
- Replace every 15,000–30,000 miles, or sooner if needed.
Why Cabin Air Filters Actually Matter
It’s tempting to shrug this off, especially when you’re trying to knock out errands and a tire shop quotes you $70 for a cabin air filter swap.
But here’s the deal: that little filter makes a big difference inside your car. The cabin air filter is like your car’s personal N95 mask.
It cleans the air coming into the interior through the heating and cooling system — trapping dust, pollen, smog, mold spores, and whatever else is floating around out there.
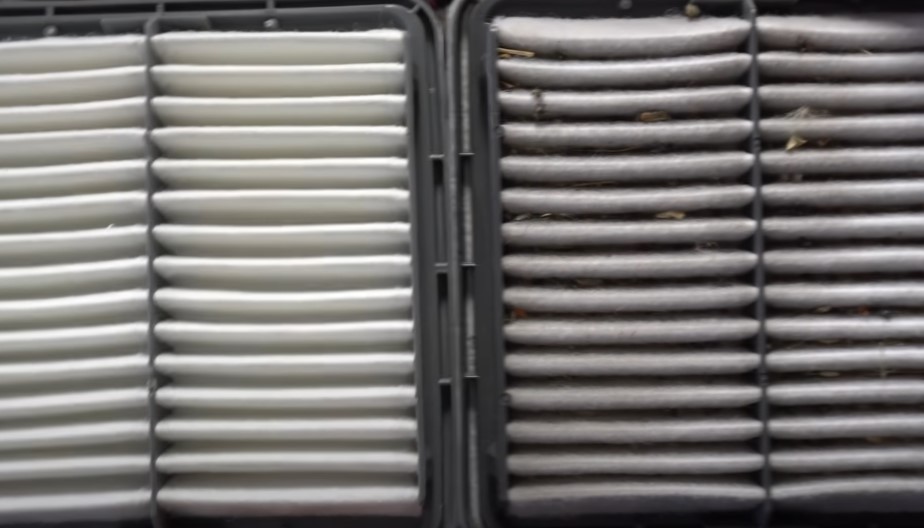
Over time, that filter gets clogged up. And when it does, you might start noticing things like:
- Weak airflow from the vents
- Strange or musty smells
- Your AC or heater working harder (which can eventually mean higher repair bills)
The good news? Swapping it out yourself doesn’t just save you cash — it keeps your lungs, and your car’s HVAC system, happy.
What You’ll Need Before You Start
You don’t need to turn your garage into a full-on auto shop. Just grab:
- A new cabin air filter (one made for your vehicle’s make, model, and year — more on that in a sec)
- Safety gloves (trust me, it can get dusty)
- Safety glasses (optional, but smart if you’re sensitive to dust)
- A flathead or Phillips screwdriver (only sometimes needed)
- Vacuum or soft brush (to clean out any junk)
- A cloth or old plastic bag (to keep the floor mat clean)
How Much Will It Cost?

Doing this yourself typically costs less than $25 — sometimes closer to $15 if you catch a sale. For example, a replacement filter for a Chrysler Pacifica minivan runs about $15.
Compare that to the $70+ you’d get charged at a shop, and you see why DIY wins big here. You can grab cabin filters at:
- AutoZone
- NAPA Auto Parts
- CarParts.com (especially useful if you want it shipped to your door with a lifetime replacement guarantee)
Most online sites let you plug in your vehicle info so you get the exact filter you need — no second-guessing.
Replace Your Cabin Air Filter in Under 10 Minutes
Alright, now to the good part. Here’s exactly how to get it done:
1. Prep Your Space
- Park on a flat surface, set the parking brake, and turn off the car.
- Toss down a cloth or old bag on the passenger floor to catch any falling dust.
- Throw on your gloves and glasses if you’re feeling extra cautious.
- Double-check that your new filter matches your car’s specs.
2. Find the Cabin Air Filter
Most vehicles stash the cabin filter behind the glove box. (Honda Civics, Toyota Camrys, Ford Fusions — all behind the glove box.) Other common spots:
- Under the hood near the windshield base
- Under the dashboard on the passenger side
If you’re unsure, your owner’s manual has the answer.
3. Access the Filter
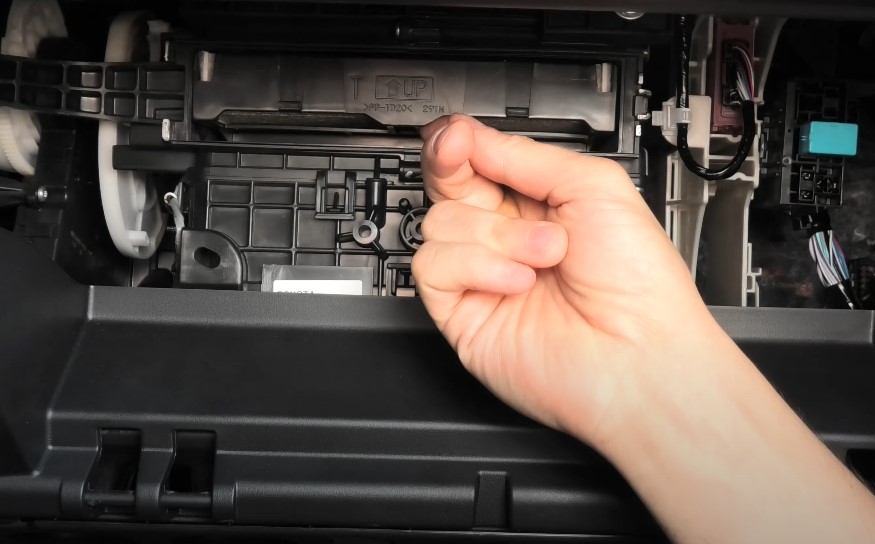
If it’s behind the glove box (most common):
- Empty the glove box.
- Find the small damper arm (it’s like a little plastic stick or cord) on the side and unhook it.
- Squeeze both sides of the glove box inward. You might hear a little “pop” as the sides flex inward and the glove box drops down.
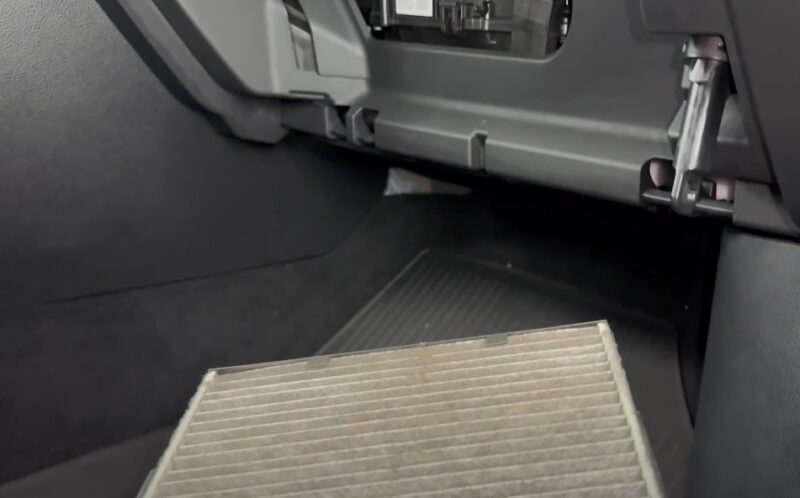
- You should see a rectangular plastic door — that’s the filter housing. It might have tabs or a few small screws.
4. Yank Out the Old Filter
- Push the tabs or unscrew the cover.
- Slide the old filter out carefully — you don’t want a cloud of dust raining down.
- Note how the old filter sits — most have arrows showing the airflow direction (usually pointing toward the cabin).
- Give the area a quick clean with a soft brush or vacuum.
If you see piles of leaves or debris, congrats — you caught it before it turned into a bigger HVAC issue.
5. Install the New Filter
- Line up the airflow arrows in the same direction as the old one.
- Slide it gently into the housing. It should fit snugly, but don’t force it.
- Snap or screw the housing cover back on.
6. Button It All Back Up
- Push the glove box back into place.
- Reconnect the little damper arm.
- Close the glove box and toss your stuff back in.
Done and done.
7. Final Check
Start up your car, crank the AC or heat, and feel the airflow. If it’s blowing strong and fresh, you nailed it. If it sounds weird or airflow seems off, double-check that the filter is seated properly.
How Often Should You Change Your Cabin Air Filter?
View this post on Instagram
Most manufacturers recommend swapping it out every 15,000 to 30,000 miles. But your driving conditions can change that:
| Driving Environment | Replacement Frequency |
| City driving with lots of traffic | Every 15,000 miles |
| Rural or low-traffic areas | Every 25,000–30,000 miles |
| Dusty or construction zones | Every 10,000–15,000 miles |
| Allergy seasons (spring/fall) | Annually |
Smart Tips for a Smoother Replacement
A few things that can make your quick DIY job even easier:
- Double-check the new filter before starting. If it’s too big or too small, you want to catch that before you take the glove box apart.
- Take a quick picture of the glove box assembly if it’s complicated — saves guessing when putting it back together.
- Handle with care. Filters aren’t delicate like glass, but you don’t want to crush the pleats.
- Don’t skip cleaning the filter housing. Leaving old debris in there just clogs up your fresh filter faster.
What Could Go Wrong (And How to Handle It)
Honestly, it’s rare that cabin air filter swaps go sideways, but every once in a while, you hit a snag:
| Problem | Solution |
| Glove box won’t unhook easily | Check for hidden screws at the sides or bottom. Some models hide fasteners under trim pieces. |
| Filter feels stuck | Wiggle it gently side to side — don’t yank or jam anything. |
| Unsure of filter direction | Most filters have arrows. If in doubt, airflow usually moves from outside into the cabin. |
| Dropped a screw | Magnetic pickup tools are cheap lifesavers. |
If you’re totally stuck, a quick YouTube search with your car’s make and model usually pulls up a walk-through. And if that still feels like too much, a mechanic can knock it out without judgment.
Why DIY Instead of Paying the Pros?
It’s not just about the money — although saving $50+ in five minutes is sweet. It’s about getting a little more comfortable with your vehicle. Cabin air filters are like “gateway” maintenance: once you swap one, you realize how much more you can handle on your own.
- Oil changes suddenly seem less scary.
- Battery replacements become doable.
- Headlight bulb swaps feel like no big deal.
Plus, nothing beats that satisfying feeling when you fire up the AC after a swap and it’s blasting clean, fresh-smelling air.